
Today, we will show you how to create a Windows VM in Proxmox. This may sound like a straightforward task, but there are certain settings in Proxmox VE that are worth checking out to make sure you get better performance in Windows. If you install Windows with the default Proxmox settings, you will likely experience poor performance.
In this article, we will install Windows 11, but the settings will work for other versions of Windows as well.
- New Roadmap
- Fewer Editions
- More Security
Prerequisites
To follow along with this guide, you need the following:
- An ISO file of Windows 11 (or any other Windows version). You can use the media creation tool to download the latest version of Windows directly from Microsoft servers.
- An ISO file of the VirtIO drivers. You can download the ISO file containing the latest stable release. For those who don't know, VirtIO drivers are paravirtualized for KVM to provide direct access to the peripherals and devices of the guest VM. Drivers for emulated devices are way too slow.
Once you have these two ISO files, you are all set to create a new Windows VM in Proxmox.
Create a new VM
- Log on to your Proxmox VE server, and click the Create VM button in the top right corner. This will launch the VM creation wizard.
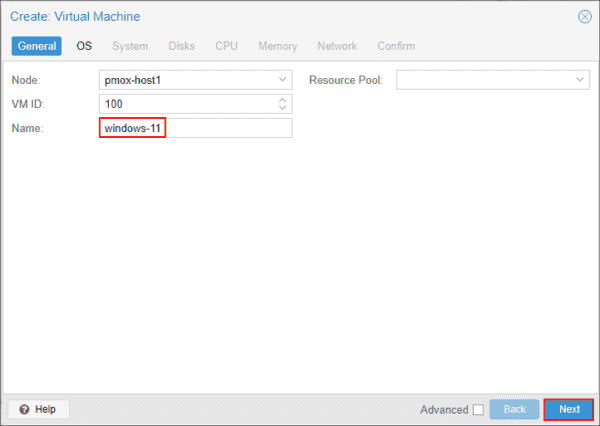
- On the General tab, enter a name for your new VM, and click Next. If you're running a Proxmox cluster, you can choose a specific node for your VM.
3. On the OS tab, select the Windows ISO file under the ISO image field. Also, make sure the Type field is set to Microsoft Windows and the Version field is set to 11/2022. You can change these settings as necessary if you're running another Windows version.

4. On the System tab, make sure the settings match the following screenshot to avoid problems with your Windows installation.
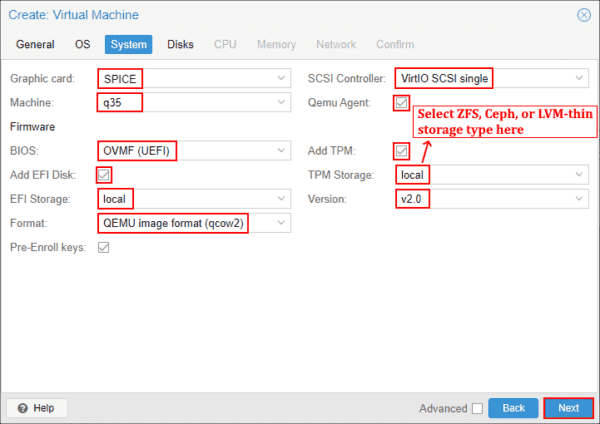
- The SCSI controller is set to VirtIO SCSI single, and the Qemu Agent option is checked.
- Under firmware options, BIOS is set to OVMF (UEFI), add EFI disk is checked, EFI storage is selected, and the EFI storage format is Qemu Image Format (qcow2).
- Check the Add TPM option, and select TPM storage and TPM version 2.0.
- If you need PCIe support for GPU passthrough on your Windows VM, make sure the machine field is set to q35 instead of i440fx.
- You can also change the graphics card from Default to SPICE (simple protocol for independent computing environments) for the best desktop experience.Tip: Proxmox uses raw disk format for the TPM disk, since the TPM emulator software does not support the qemu image (qcow2) format. If you set local directory-based storage for the TPM disk, you will not be able to create live snapshots of the VM, and you will see a message stating, "The current guest configuration does not support taking new snapshots," as shown in the screenshot below:
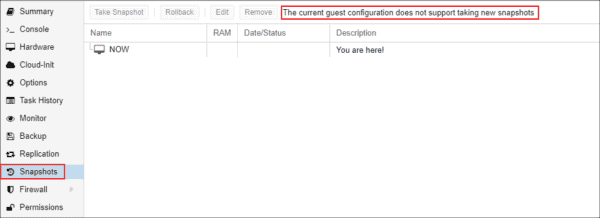
To get around this problem, you should choose a storage for the TPM disk that allows snapshots of raw disk formats. A few examples of such storage types are ZFS, BTRFS, Ceph, and LVM-thin.
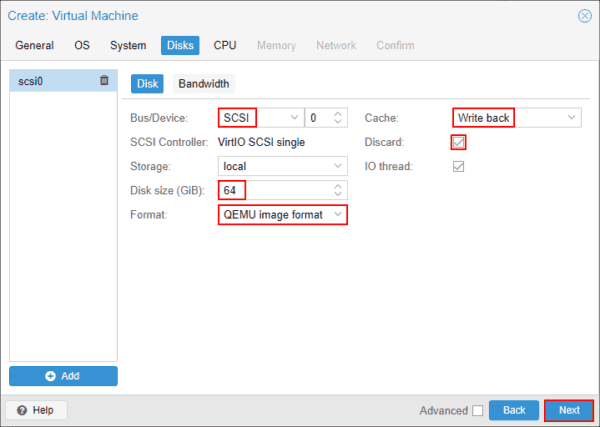
5. On the Disks tab, make sure you set the Bus/Device option to SCSI and the Cache to write back to get good performance. You can check the Discard option, which allows the Proxmox node to reclaim free space; this is equivalent to the TRIM option for SSD drives. Enter the disk size as required, and keep the disk format as QEMU image format. Then click Next.
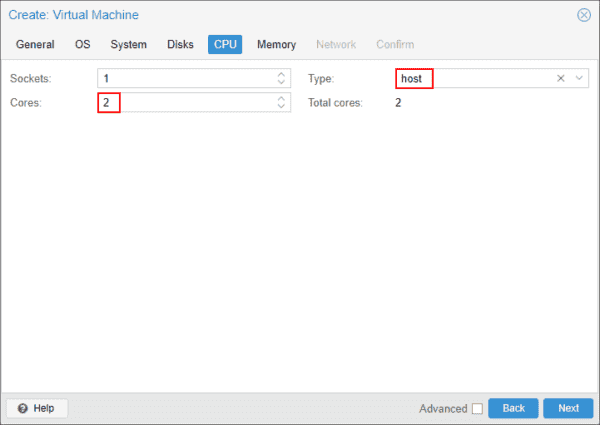
6. On the CPU tab, specify the required number of cores, but more importantly, set the CPU type to host. The kvm64 CPU type offers limited instruction sets for your guest OS, which could be slow for some use cases.
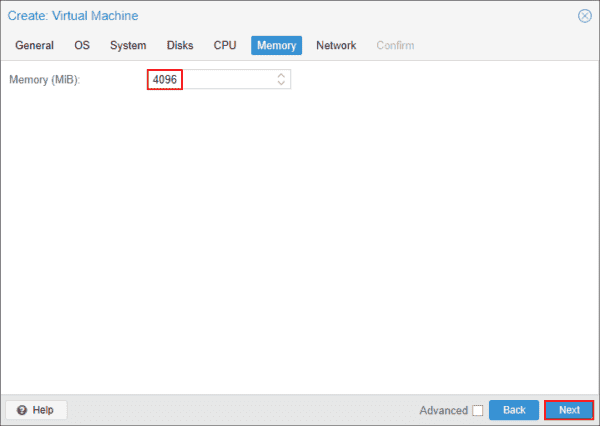
7. On the Memory tab, allocate the required memory for the VM, and click Next.
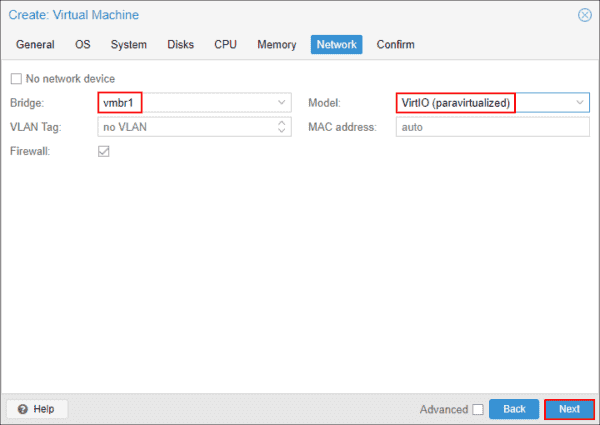
8. On the Network tab, select the required bridge for your VM. Make sure you set the model to VirtIO (paravirtualized) to get the best network performance on your Windows VM.
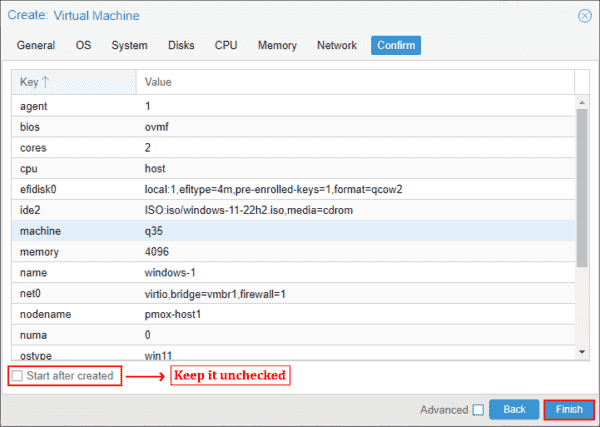
9. Now confirm all the settings, but make sure the Start after created option is unchecked. We need to add another DVD drive to our VM to mount an ISO file containing VirtIO drivers before actually starting the VM.
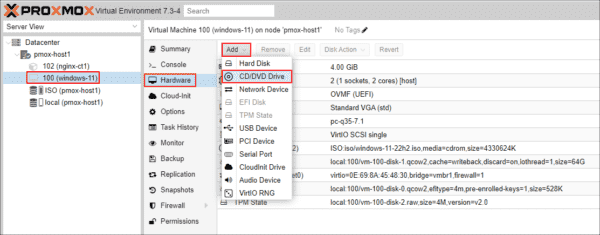
10. Now, select your VM under the Proxmox node, click the Hardware tab, and then click Add to open a dropdown menu. Next, select the CD/DVD Drive option, as shown in the screenshot below.
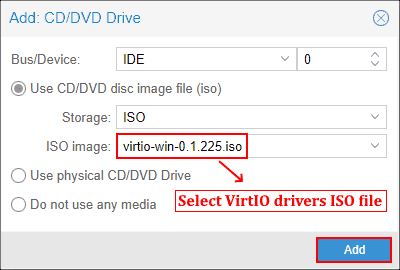
11. Select the ISO file containing the VirtIO drivers to be mounted that you downloaded earlier, and click OK.
 12. Now, start the VM, and initiate the Windows setup.
13. Select the language, time and currency, and input method, and click Next.
14. Read and accept the Microsoft software license terms, and click Next.
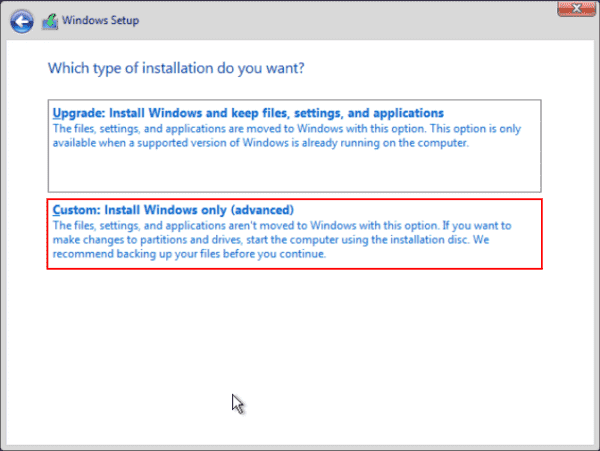
15. On the installation type screen, click the Custom: Install Windows only (advanced) option.
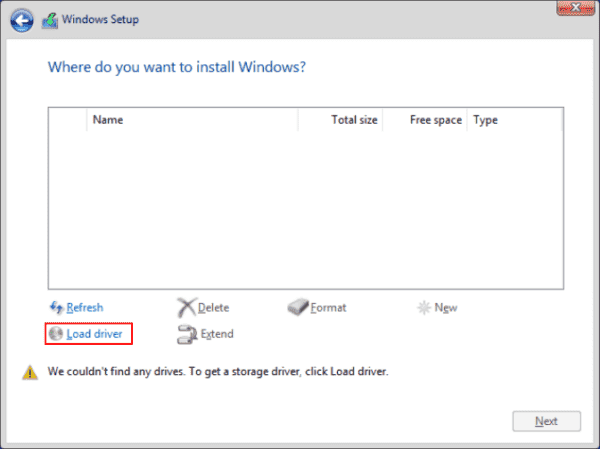
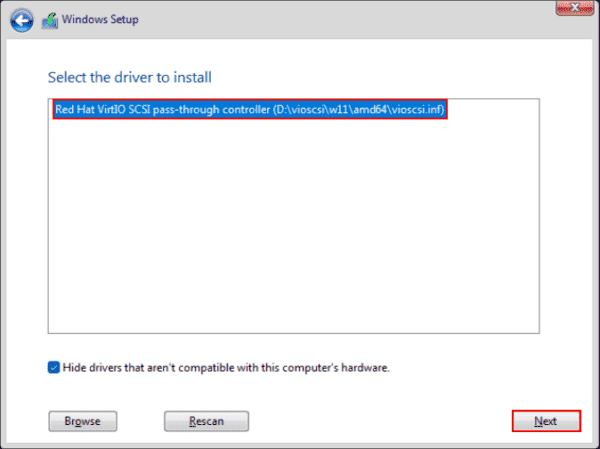
16. Now comes the interesting part. You will notice that there is no disk to install Windows. This is because we selected the VirtIO SCSI controller for the VM disk, so Windows could not detect the disk. Click the Load driver option, as shown in the screenshot below.
17. Now, click the Browse button, and select the DVD drive where you mounted the VirtIO ISO file.

18. Browse the folders, and select the folder corresponding to your Windows version. I selected the D:\vioscsi\w11\amd64 folder. If you're installing Windows 10, select the w10 folder. Similarly, select the 2k22 folder if you are installing Windows Server 2022.

19. The Windows setup automatically picks a suitable driver for an SCSI controller. In our case, it is D:\vioscsi\w11\amd64\vioscsi.inf. Click Next to proceed with the detected driver.
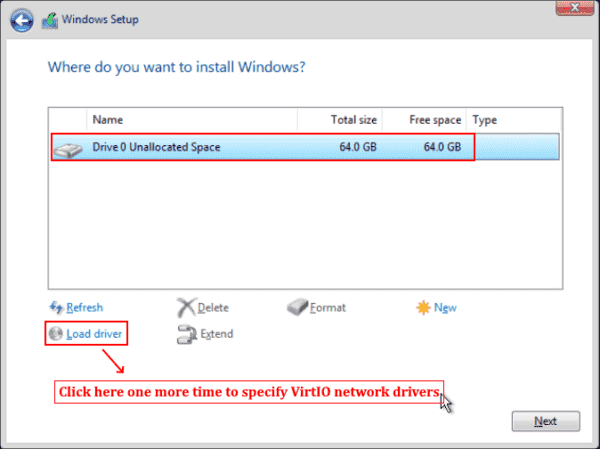
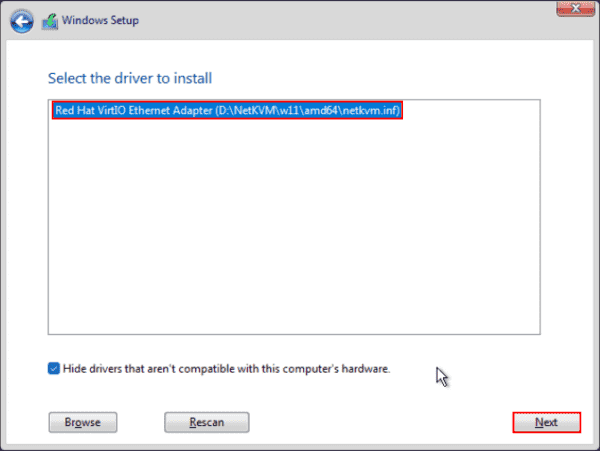
20. You will notice that the disk is now detected. Click Load driver one more time and select the VMNet folder to specify the VirtIO network adapter driver.
21. In my case, it is located under D:\NetKVM\w11\amd64\netkvm.inf. You can skip installing a network driver at this stage. However, installing a network driver at this point allows Windows to connect to the internet and pull the necessary updates during the installation.
22. You can now partition your disk and install Windows.

23. When the Windows installation is done, complete all the initial configuration, launch File Explorer, and browse the drive on which the VirtIO ISO file is mounted. Locate and run a file named virtio-win-gt-x64.msi (or virtio-win-gt-x86.msi). The name might be different if you use another Windows version.
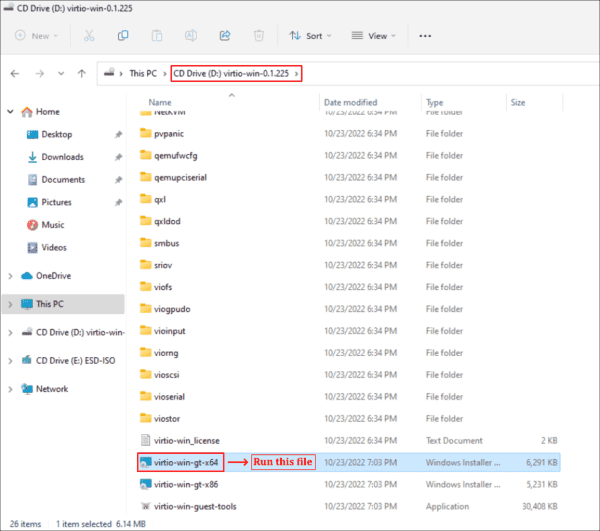
This will install all the VirtIO drivers that are needed by your Windows VM, including the ballooning service, for efficient memory management.
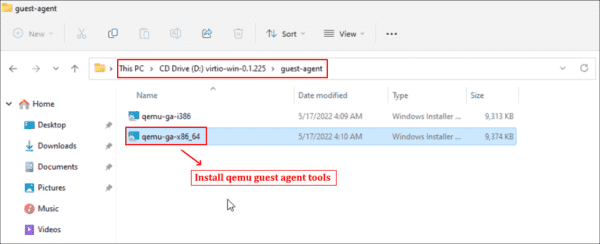
24. Finally, open the guest agent folder and run the qemu-ga-x86_64.msi file to install the qemu guest agent. This is optional but very useful for information exchange between your Proxmox node and the guest OS. It also allows you to run commands remotely.
25. Finally, if you selected the SPICE graphics card, you need to install the spice guest tools on your VM and virt-viewer on the client system from where you will access this VM. If you launch the Device Manager on your Windows VM, there should be no driver missing.
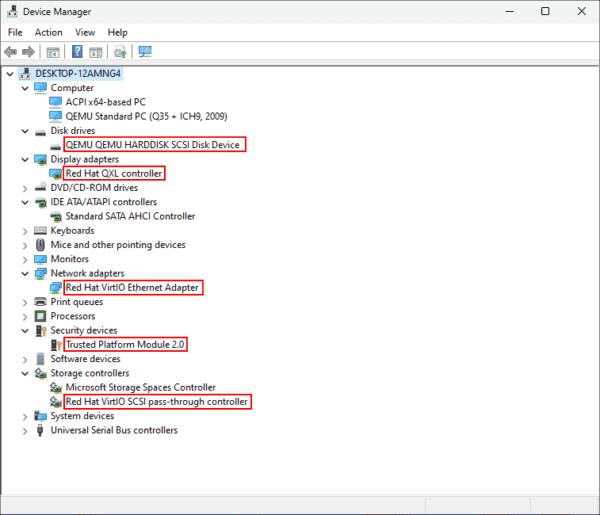
If you see something missing, you can manually install the drivers from the VirtIO ISO file. That's it; you have successfully created a VM running Windows 11 in Proxmox VE.
